As a Linux administrator, you understand the significance of regular backups for your servers. Having backups is like having an insurance policy for your data – it’s always better to have it, just in case. And what’s even better? Automating this process with a Bash script and the rsync tool.
This tutorial will guide you through the creation of a Bash script to backup an entire Linux server to another Linux server using rsync. You’ll learn to design the script efficiently to avoid any potential issues during the backup process.
We’ll begin by discussing the rsync options:
“-a” option preserves permissions, ownership, timestamps of the files/directories transferred, equivalent to the options -rlptgoD.
“-A” option saves Access Control Lists (ACLs) to specify fine-grained permissions for files/directories.
“-X” option retains extended attributes, metadata for files/directories beyond the standard permissions and timestamps.
“-H” option keeps hard links between files, which point to the same file data on the file system.
“-v” option provides detailed output to monitor the transfer process.
“–delete” option deletes files from the target that are missing from the source, keeping the backup in sync with the source.
With these options, your backup will be a complete and accurate representation of the source server.
PID & Exclude
Next, we’ll add an exclusion list to exclude unneeded directories like /sys/, /proc/, /dev/ , /srv/, /mnt/, /media/ and /lost+found/. These are system directories that don’t contain valuable data. Excluding them will speed up the backup and reduce storage space on the target server. (Please note that /mnt might include external mounts and /media attached USB storage devices on your server, if needed remove them from the exclude list.)
Moving on to the script itself, it starts by checking if another instance of the script is running by looking for a PID file. When found, the script reads the PID and checks if the process is running. If another instance is running, the script exits with code 1 to indicate failure.
If another instance is not running, the script writes the current PID to the PID file to indicate it is running. The script then sets the source and target servers and the exclusion list for the rsync transfer.
Finally, the script runs the rsync command with the specified options and exclusion list. After the transfer, it checks the exit code of the rsync command to determine success or failure. If successful, it removes the PID file and exits with code 0. If not, it removes the PID file and exits with a non-zero exit code to indicate failure.
SSH Keys
We’ll then set up the SSH keys for rsync. The script checks for the presence of a key in $HOME/.ssh/ directory. If not found, it generates a new key using ssh-keygen.
The new or existing key is then copied to the target server with ssh-copy-id. This step is necessary for the source server to connect to the target server without a password. The rsync command uses the “-e” option and the “ssh -i $HOME/.ssh/id_rsa” argument to specify the private key for the ssh connection.
By using SSH keys, the script ensures secure and automated transfers. You won’t need to enter a password, making the backup process more efficient and less prone to human error.
And that’s it! A simple and efficient way to automate backups for your Linux servers using rsync and a Bash script.
Script
#!/bin/bash
# 01-02-2023 scripting[at]w-solutions[dot]dev

####################################################################
# Define the source and target servers
[email protected]:/
[email protected]:/backup/

####################################################################
# Check if screen is installed
if ! command -v screen &> /dev/null; then
  echo "Screen is not installed, installing it now..."
  # Install screen package using the system's package manager
  if [ "$(which apt-get)" != "" ]; then
    sudo apt-get install screen -y
  elif [ "$(which yum)" != "" ]; then
    sudo yum install screen -y
  elif [ "$(which pkg)" != "" ]; then
    sudo pkg install screen -y
  elif [ "$(which apk)" != "" ]; then
    sudo apk add screen -y
  else
    echo "Your system's package manager is not supported. Please install screen manually."
    exit 1
  fi
else
  echo "Screen is already installed."
fi

####################################################################
# Check if rsync is installed
if ! command -v rsync &> /dev/null; then
  echo "Screen is not installed, installing it now..."
  # Install screen package using the system's package manager
  if [ "$(which apt-get)" != "" ]; then
    sudo apt-get install rsync -y
  elif [ "$(which yum)" != "" ]; then
    sudo yum install rsync -y
  elif [ "$(which pkg)" != "" ]; then
    sudo pkg install rsync -y
  elif [ "$(which apk)" != "" ]; then
    sudo apk add rsync -y
  else
    echo "Your system's package manager is not supported. Please install rsync manually."
    exit 1
  fi
else
  echo "rsync is already installed."
fi

####################################################################
# Check if ssh key is present
if [ ! -f "$HOME/.ssh/id_rsa" ]; then
  echo "SSH key not found, generating one now..."
  ssh-keygen -t rsa -b 4096 -f "$HOME/.ssh/id_rsa" -q -N ""
fi

# Copy ssh key to target server
echo "Copying ssh key to target server... Please enter your password once."
ssh-copy-id -i "$HOME/.ssh/id_rsa.pub" "$target_server"

####################################################################
# Define the excluded directories
excluded_dirs=(
  "sys/*"
  "proc/*"
  "dev/*"
  "tmp/*"
  "run/*"
  "mnt/*"
  "media/*"
  "lost+found/*"
)

excluded_options=""
for dir in "${excluded_dirs[@]}"; do
  excluded_options="$excluded_options --exclude=$dir"
done

####################################################################
# Check if another instance of the script is already running
pid_file="/var/run/rsync_backup.pid"
if [ -f $pid_file ]; then
    pid=$(cat $pid_file)
    if kill -0 &> /dev/null $pid; then
        echo "Another instance of the script is already running."
        exit 1
    else
        #Remove stale pid file
        rm $pid_file
    fi
fi
echo $$ > $pid_file

####################################################################
# Synchronize files using rsync with ssh keys
screen -dmS rsync_backup
screen -S rsync_backup -p 0 -X eval 'rsync -aAXHv --delete $excluded_options -e "ssh -i ~/.ssh/id_rsa" $source_server $target_server'
screen -X -S "rsync_backup" quit

####################################################################
# Remove the pid file
echo "Backup complete, removing lock file..."
rm $pid_file

####################################################################
# Check the exit code of the rsync command
if [ $? -eq 0 ]; then
  echo "The rsync backup was successful."
  exit_code=0
else
  echo "The rsync backup failed."
  exit_code=1
fi

####################################################################
# Exit with the appropriate exit code
exit $exit_code
Do you need help with Linux servers? Reach out and see what we can do for you or visit our store to browse through the different support packages we offer.
Here is an example of a docker-compose file that bridges the network of docker containers to the specified VLAN. Make sure you have bridged adapter to the VLAN network and change all the network settings that are bold.
As we’ve build our network we isolated every single application we run. For each device in our network we’ve set firewall rules to only allow services/protocols/ports that are mandatory for proper operations. Quite a bit of overkill but in turn with some proper firewall rules, gives peace of mind…
In this guide we’ll show you how to integrate your IP camera in Home Assistant using Agent DVR via Docker which will connect to your IP camera and will make the camera available in Home Assistant.
Next we’ll use DeepStack Artificial intelligence via Docker for object detection.
Finally we’ll setup Agent DVR MQTT to get a Binary Sensor in Home Assistant that reports on the state of the object detection. Where we then are able to setup all kinds of cool automation’s using Home Assistants build in automation platform or Node-Red.
Camera’s
In our guide we’ve used the Annke C800 and the NC400 (NC400 has awesome color night vision!) which are great camera’s for their prices and are outperforming nearly all competitors in their tiers. Highlights on the Annke camera/recorder line are:
Easy of use
Intuitive recorder UI
Quality
Reliability
Perfect price/quality ratio
Check this video by The Hook Up reviewing the C800 camera in a detailed comparison.
Setup object detection in Home Assistant with IP cameras
MQTT Addon Home Assistant
Agent DVR MQTT settings
Object detection binary sensors in Home Assistant
Installation one liners
Note: Due to privacy we’ve set a “privacy mask” on some of our screenshots/video’s (ones without are publicly available).
1. Prerequisites
This guide assumes that you have Home Assistant OS installed on a device listed here
This guide assumes that you have Docker setup on a x86 device
The additional software components can be installed:
on the same device as Home Assistant via Docker x86 (Portainer is also an option, though deprecated, still available here and here).
on a RaspberryPI (Debian Lite or Ubuntu Server) not that powerful but will still do the job. Agent DVR via Docker is not available on ARM but a one liner to install Agent DVR is available.
on another Linux or windows device with more resources and possibly a GPU (not required)
We’ll first start by setting up the camera, in our case we are using the Annke C800. We’ve powered it up with POE via our Unifi Switch 24 Pro. If your having trouble finding the IP address of your device, please see the “Network discovery tools” links above.
Once you’ve figured out the IP address of the camera, head over to its web UI and login. In our case its http://192.168.14.4:80
We’d like to point out that most if not all IP camera’s have a a Main and a Sub stream. Below we’ll clarify why these are used and in a later section we’ll explain how to use them (in Agent DVR).
Main-stream: stream resolution is higher than sub-stream, for local video streaming, output high definition video to display on the local monitor, also record HD video on your local network network video recorder (NVR). The main-stream resolution are (not limited to) 2560×1920 (5 megapixel), 2048×1536 (3 megapixel) 1920×1080 (1080p) and 1280×720 (720p). Additionally, main-stream delivers real-time (30fps or even high frame rate 60fps) HD video stream, this ensures local recording footage offers detailed information without missing anything important.
Sub-stream: offering low/standard definition video primarily for lower bandwidth situations, the sub-stream resolution are QCIF, CIF, 2CIF, DCIF, 4CIF (D1). Sub-stream may not transmit real time video, but transmit key frames and sub-frames to deliver video. This also can decrease the network bandwidth burden, which in turn achieves smooth video in low bandwidth situations.
You’re able to switch between the two streams to see the difference. At the main page after login, bottom left, click the middel of the 3 icons.
1 = Main-stream
2 = Sub-stream
Presented with a neat looking user interface we’ll start by checking the NTP server functionality for proper time display. Head over to Configuration, System Settings and Time Settings. Set your timezone and NTP server and hit test. If all is in order hit save.
Under Security Service we’ve enabled Enable Illegal Login Lock and set the threshold to 5. So if you’ll enter a wrong password 5 times, you’ll be locked out for a certain period of time.
Under User Management the Annke software also has a cool feature to view the currently logged in “Online Users“. Should you ever want to troubleshoot the connection from a device that pulls in the stream of that cam, you can!
Next we’ll enable HTTPS under Network, Advanced Settings, HTTPS
That concludes the camera configuration, please note your camera IP, model, username and password after setting the camera up for the first time, we’ll need it later!
5. Setup our Annke C800 camera in Home Assistant
5.1Install Agent DVR
Agent DVR is an advanced video surveillance platform for Windows, macOS, Linux, Raspberry Pi and Docker. Agent has a unified user interface that runs on all modern computers, mobile devices and even Virtual Reality.
It is also the first DVR/NVR Software that supported every camera we threw at it and has a vast pool of features easy to use for everyone.
We’ll install Agent DVR via this link, pick your appropriate platform and install it.
In our case we are using the Docker method on a Debian based x86 OS (Ubuntu should work as well) inside a Virtual Machine (which also has Home Assistant installed via the Linux Installation Method).
Note that the Docker option will not work for ARM devices, you’ll have to use the macOS/Linux/RPi installation option for ARM (RaspberryPI’s etc).
If you need to install Docker on your Debian/Ubuntu server, run:
curl -sSL https://get.docker.com | sudo bash
Use one of the two methods below, if unsure use Docker run
It might be the case that you’ll want to store your recordings on a NAS or via another way of remotely storing data. In these cases, file permissions are a quick issue to encounter. If you’re storing elsewhere than the default (/appdata/ispyagentdvr/*) please check the destination folders permissions with
notroot@DietPi:~# ls -la /Recordings/
total 8
ddrwxr-xr-x  2 media media 4096 May  2 19:41 .
drwxr-xr-x 19 root   root   4096 May  2 19:41 ..
Now we know the user and group “media” owns the folder /Recordings and we can get the user id. You can swap out /Recordings with any remotely mounted folder eg /mnt/nfs1.
stillnotroot@DietPi:~# id media
uid=1000(media) gid=1000(media) groups=1000(media)
You can substitute /appdata/ispyagentdvr/media with your preferred directory to store recordings but make sure you set the proper docker PUID and PGID in relation to the actual folders permissions with:
version: '3.3'
services:
    ispyagentdvr:
        restart: always
        environment:
            - PUID=1000 # Change to user ID
            - PGID=1000 # Change to group ID
            - TZ=America/Los_Angeles
        ports:
            - '8090:8090'
            - '3478:3478/udp'
            - '50000-50010:50000-50010/udp'
        volumes:
            - '/appdata/ispyagentdvr/config/:/agent/Media/XML/'
            - '/Recordings/:/agent/Media/WebServerRoot/Media/'
            - '/appdata/ispyagentdvr/commands:/agent/Commands/'
        container_name: agentdvr
        image: doitandbedone/ispyagentdvr
Now that Agent DVR is installed we can add our previously setup Annke C800 to it. Head over to the web UI of Agent DVR, in our case its http://192.168.9.235:8090
Hit the menu icon top left and add a new device. Use the IP Cam Wizard and turn on alerts when prompted.
For make and model we’re selecting the Annke C800, Agent DVR has a huge database of supported cameras so yours should be there as well! If not you can just select “unlisted” and it will search the given IP address for valid protocols and URLs.
I’ve selected the first ONVIF entry shown in the results.
Note that channel 1 is the good quality “Main-stream” and channel 2 is the lower quality “sub-stream” or live stream. You can change the recording channel and live feed channel if you edit the camera settings and click on the 3 dots next to “source type“.
Ideally we’d want to use the “sub” stream as “live” view and only record at the highest quality when motion is detected in order to minimize the network and system resource footprint especially in multi camera environments without a GPU. Where a “sub” stream of lets say 640*480 at 256-768 Kbps with around 5-10 FPS is perfectly usable for object detection. Compare this to using the snapshot images of the “main” stream of 3840*2160 with a max bit-rate of 5120 Kbps at 15. This gives a lot of overhead compared to the “sub” stream which does its job.
5.3 Configure camera settings
5.3.1 General camera config:
Make sure MQTT Events is On to report all events to Home Assistant
For Max Framerate please consider that a higher framerate equals higher bandwidth usage and higher processing times. In a multi camera setup we’ve settled for 10 FPS for live viewing and 30+ for recording. Right now for the sake of the guide we’d like a crispy smooth image so we’ve set it to 30 FPS.
Try toggling the Resize button and see what that does for your image quality. I had to turn ours off to get a better looking image in the Agent DVR web UI.
5.3.2 Actions config:
Next we’ll add an action to run (MQTT publish) whenever DeepStack Artificial intelligence detects a specified object. We have not yet setup the MQTT broker in Home Assistant but for now we can pre fill these settings.
Go to your camera settings, Actions and hit Add
Then we’ll add the first action that will set the state to ON whenever objects are detected.
If: DeepStack Object Found
Then: MQTT
Topic: ObjectDetection/{NAME}/state {NAME} will automatically be set to your camera name
Post: ON In Caps
Then add the second action which will add details about the detection to the MQTT “json” topic.
If: DeepStack Object Found
Then: MQTT
Topic: ObjectDetection/{NAME}/json
Post: {AIJSON}
The {AIJSON} will report something like this:
{AIJSON}
5.3.3 Alerts config:
Agent DVR integrates with DeepStack Artificial intelligence to provide intelligent object detection and Facial Recognition services. Agent DVR uses DeepStack object detection to apply an intelligent filter to alerts to reduce the number of false alert events to near zero.
You configure Agent as usual with a motion detector / alert configuration and then add DeepStack alert filtering to ignore alerts that don’t have specific objects in the frame – like car, person, dog etc.
Make sure the settings reflect the image below. Then hit configure and copy over the settings of the next screen. You can tweak your desired object recognition items under the configure menu with the above mentioned in mind, for now we use person and a remote control.
5.3.4 Detector config:
Enable the detector and set the type to Objects
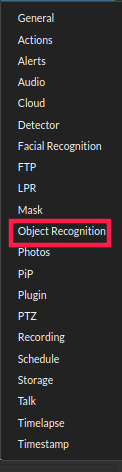
5.3.5 Object Recognition config:
In addition to the intelligent alert filter Agent DVR also offers general object recognition. This will generate events like “DeepStack Object Found” and “DeepStack Object Not Found” that you can perform actions on. General object recognition can be triggered by motion detection, alerts or via API
Edit a camera and go to Object Recognition
5.4 Add “Agent DVR” Home Assistant Integration
Go to Home Assistant’s web UI to Configuration, Devices & Services and hit + Add integration. Search for “Agent DVR”.
Add Agent DVR and enter the IP address and port (8090 is default) where you host your Agent DVR.
In our case we’ll go to http://192.168.9.235:8123/config/integrations and we’ll point Home Assistant to IP 192.168.9.235:8090 for Agent DVR as in our case they are hosted on the same machine.
Now after adding Agent DVR you’ll have an Alarm Control panel and a new camera device and entity, check it out under devices, search for “camera.” and see if your camera is present.
To get started, install DeepStack for your platform (Docker). Use the GPU version if possible (you’ll need an nvidia card for GPU acceleration). Make sure it’s running in Vision Detection mode. To do that via the command line pass in “-e VISION-DETECTION=True”.
version: '3.3'
services:
    deepstackai:
        container_name: DeepStackAI
        restart: always
        environment:
            - PUID=1000 # Change to user ID owning the destination folder
            - PGID=1000 # Change to group ID owning the destination folder
            - VISION-DETECTION=True # Enable for object detection
            - VISION-FACE=False # Enable for facial recognition
            - TZ=Europe/Berlin
        volumes:
            - '/Recordings/Deepstack/Objectdetection:/datastore/object'
            - '/Recordings/Deepstack/FacialRecognition:/datastore/facial'
        ports:
            - '90:5000'
        image: deepquestai/deepstack
It will take a while to download all the libraries for the container. Afterwards when the Docker run or compose command is finished, check the logs for anything funky docker logs DeepStackAI
Once DeepStack Artificial intelligence is installed and running (docker ps) it will expose itself to the network via port :90 (ss -tunlp should report docker-proxy on port :90) if you’re using the same configuration we’ve provided. Lets enter our IP where DeepStack Artificial intelligence is hosted and port :90. In our case it will be http://192.168.9.235:90
7. Setup object detection in Home Assistant with Annke cameras
7.1 MQTT Addon Home Assistant
To create a sensor in Home Assistant we’ll need data and a supported platform. Agent DVR will provide the data now all we need is a supported platform, here comes MQTT in to play.
We will install The MQTT Add-on to create our own MQTT Broker (server) where our Agent DVR (Write) and Home Assistant (Read) will subscribe to in order to be able to exchange messages about the state of the object detection and update the sensor accordingly.
Install the MQTT Addon in Home Assistant. In our case by going to http://192.168.9.235:8123/hassio/addon/core_mosquitto/info
Configuration
Add-ons, Backup…
Add-on Store
Install Mosquitto broker
7.2 Agent DVR MQTT settings
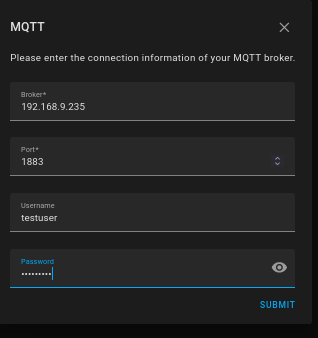
Now we’ll head over to Agent DVR again to setup the MQTT settings it needs to connect to the Home Assistant MQTT broker Add-on. Do so by going to the menu top left, Configuration, Settings, MQTT
Server: 192.168.9.235
Port: 1883
Client ID: agentdvr
Username: homeassistantuser (change with your actual credentials)
Password: homeassistantpass (change with your actual credentials)
Leave the rest of the settings at default
After adding the MQTT broker to Agent DVR also make sure that “MQTT Events” in the camera’s General config is On
To finalize our Agent DVR settings we need to restart our Docker container with docker restart agentdvr
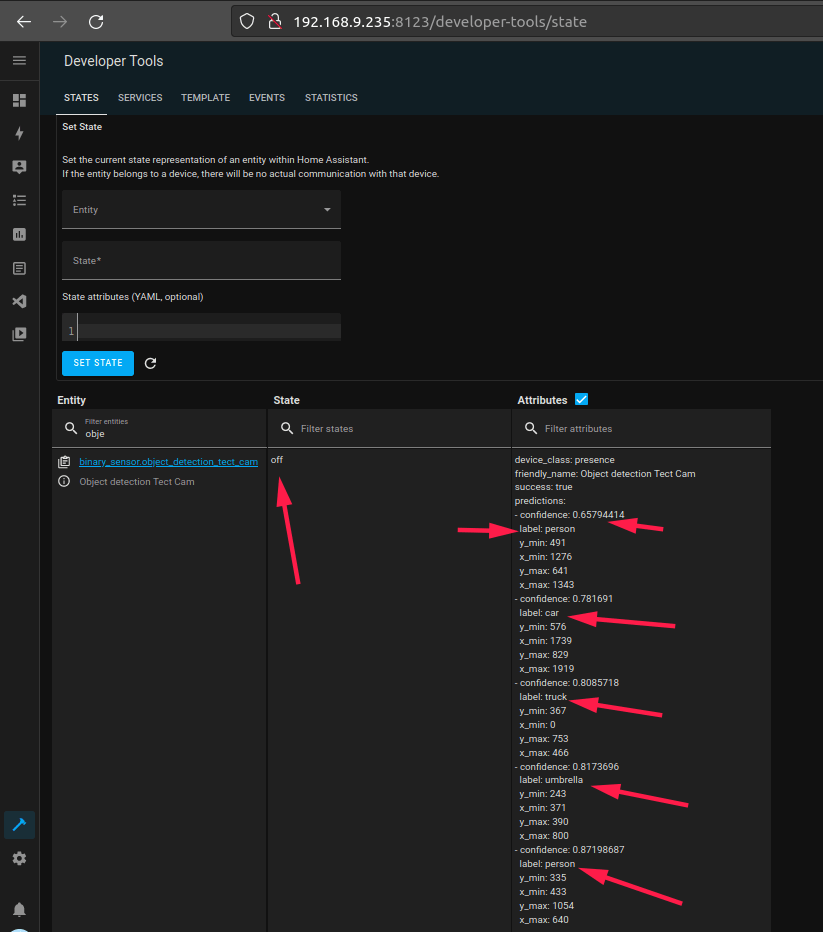
7.3 Object detection sensors in Home Assistant
We’ll configure our binary sensor for the object detection to point to the configured MQTT topic we’ve set earlier during the camera configuration. But first we’ll connect Home Assistant to the MQTT broker so we can setup our Binary Sensor in Home Assistant.
In Home Assistant go to Settings, Devices & Services, Integrations There you’ll probably see MQTT as discovered. If so hit configure to set it up. If its not discovered hit + Add Integration and search for MQTT and add it.
We are using IP:PORT 192.168.9.235:1883 as the broker is installed on our VM using port 1883. Use the username and password you’ve setup during the installation of Home Assistant or create a separate user and use that.
We’ll add a Binary Sensor in Home Assistant with the following config, make sure to replace YOURCAMERANAME with the proper value.
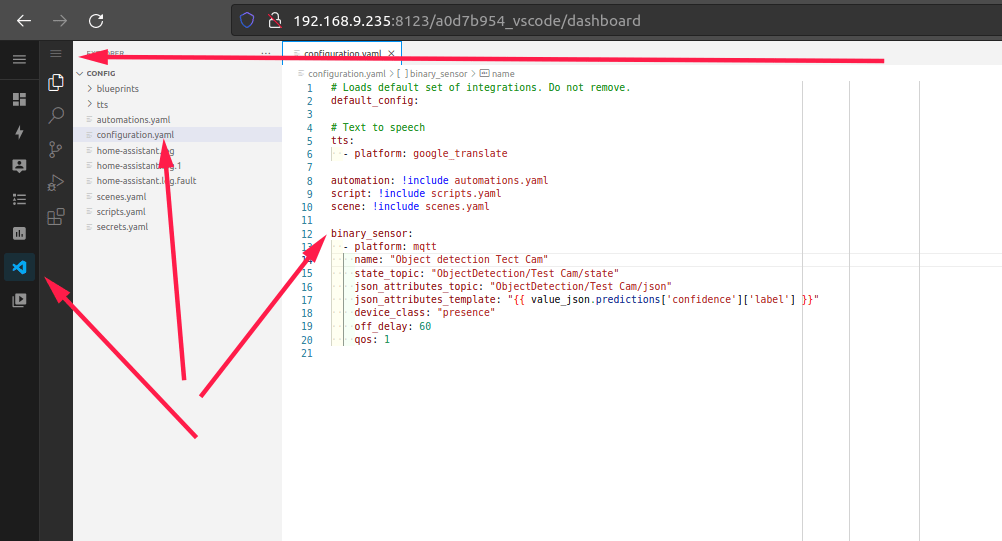
Now in order to edit configuration.yaml we’ll use the Addon VsCode. You can you any means you like to edit it, SSH, SMB etc.
Go to Home Assistant Settings, Add-ons, Backups & Supervisor, Add-on Store and install Studio Code Server
Once installed open VsCode via the sidebar menu in Home Assistant and open up configuration.yaml and add the sensor config.
Once added, check your Home Assistant config for errors in the configuration, settings menu, if all is ok then restart Home Assistant.
Upon restart you should have a binary sensor called “Object detection YOURCAMERANAME”
We can now create cool automations based upon the object detection. Few things we’ve thought about making another guide on, specific to Artificial intelligence and Home Assistant are;
Unlock and lock post box if the postal service (DHL, UPS etc) logo is detected and start recording and output a screenshot to telegram.
Motion / presence detection sensors. Facial recognition flags a family member home or away using door sensors to fire the event.
Upload to specific NAS folders based upon object detection details.
Start stream to Chromecast/Home Assistant Web when object “X” is detected
Note: Replace the deb file with the latest version from the releases page. Also make sure you have Docker installed already!
One thing I noticed that installing network-manager on my DietPi Debian distro cleaned out /etc/network/interfaces thus resulting in no connection to the box. Hence the backup and restore of the interfaces file.
Here is a little bash script I wrote to create a folder for every day, given an X amount of days.
The output format is adjustable and is just the $date command in linux with some parameters
It also filters out Saturday and Sunday but you can substitute that for any other combination of course.
The scripts provided are free to use / edit and do anything you want with. No support via email is given, only the comment section for each script is open for clarification or bug reports.
For the creation of custom scripts please contact me.
#!/bin/bash
# This script will create a folder for every day in any $date format you like
# [email protected]
###################################################################################
OUTPUTFORMAT='+%m-%d-%Y %A' # This will output: $DIRECTORY/1. January/01-01-2022 saturday
DIRECTORY='/tmp/test' # Work directory
USER='www-data' # User permissions
GROUP='www-data' # Group permissions
CHMOD='750' # File permissions
#DATE=$(date +%Y-%m-%d) # Current day.
DATE='2022-01-01' # Set to the 1st of Jan of year XXXX then set "for i in {0..365}" to the number of days you'd like to create folders for.
####################################################################################
# Enter destination directory
mkdir -p "$DIRECTORY"
cd "$DIRECTORY"

# Create monthly folders
mkdir -p '1. January'
mkdir -p '2. February'
mkdir -p '3. March'
mkdir -p '4. April'
mkdir -p '5. May'
mkdir -p '6. June'
mkdir -p '7. July'
mkdir -p '8. August'
mkdir -p '9. September'
mkdir -p '10. October'
mkdir -p '11. November'
mkdir -p '12. December'

# Create folders for every day for a year. Change 365 to the actual number of days you'd like
for i in {0..365}
do
   NEXT_DATE=$(date "$OUTPUTFORMAT" -d "$DATE + $i day")

   # Filter out certain days, in this case weekend days and create a folder for each weekday for the entire year
   echo "'$NEXT_DATE'" | xargs mkdir
done

# Filter out folders
find "$DIRECTORY" -type d | grep 'Saturday' | sed -e 's/$/"/' | sed -e 's/^/"/' | xargs rm -r
find "$DIRECTORY" -type d | grep 'Sunday' | sed -e 's/$/"/' | sed -e 's/^/"/' | xargs rm -r

# Sort in proper monthly folder
mv "$DIRECTORY"/01-*-* "$DIRECTORY"/'1. January'/
mv "$DIRECTORY"/02-*-* "$DIRECTORY"/'2. February'/
mv "$DIRECTORY"/03-*-* "$DIRECTORY"/'3. March'/
mv "$DIRECTORY"/04-*-* "$DIRECTORY"/'4. April'/
mv "$DIRECTORY"/05-*-* "$DIRECTORY"/'5. May'/
mv "$DIRECTORY"/06-*-* "$DIRECTORY"/'6. June'/
mv "$DIRECTORY"/07-*-* "$DIRECTORY"/'7. July'/
mv "$DIRECTORY"/08-*-* "$DIRECTORY"/'8. August'/
mv "$DIRECTORY"/09-*-* "$DIRECTORY"/'9. September'/
mv "$DIRECTORY"/10-*-* "$DIRECTORY"/'10. October'/
mv "$DIRECTORY"/11-*-* "$DIRECTORY"/'11. November'/
mv "$DIRECTORY"/12-*-* "$DIRECTORY"/'12. December'/

# Set permissions
chmod -R "$CHMOD" "$DIRECTORY"
chown -R "$USER":"$GROUP" "$DIRECTORY"

exit 0
This website uses cookies to improve your experience. We'll assume you accept this policy as long as you are using this websiteAcceptView Privacy Policy